Nandan Nair

  • Forest-Impressionism

    Forest-Impressionism

Forest – Impressionism

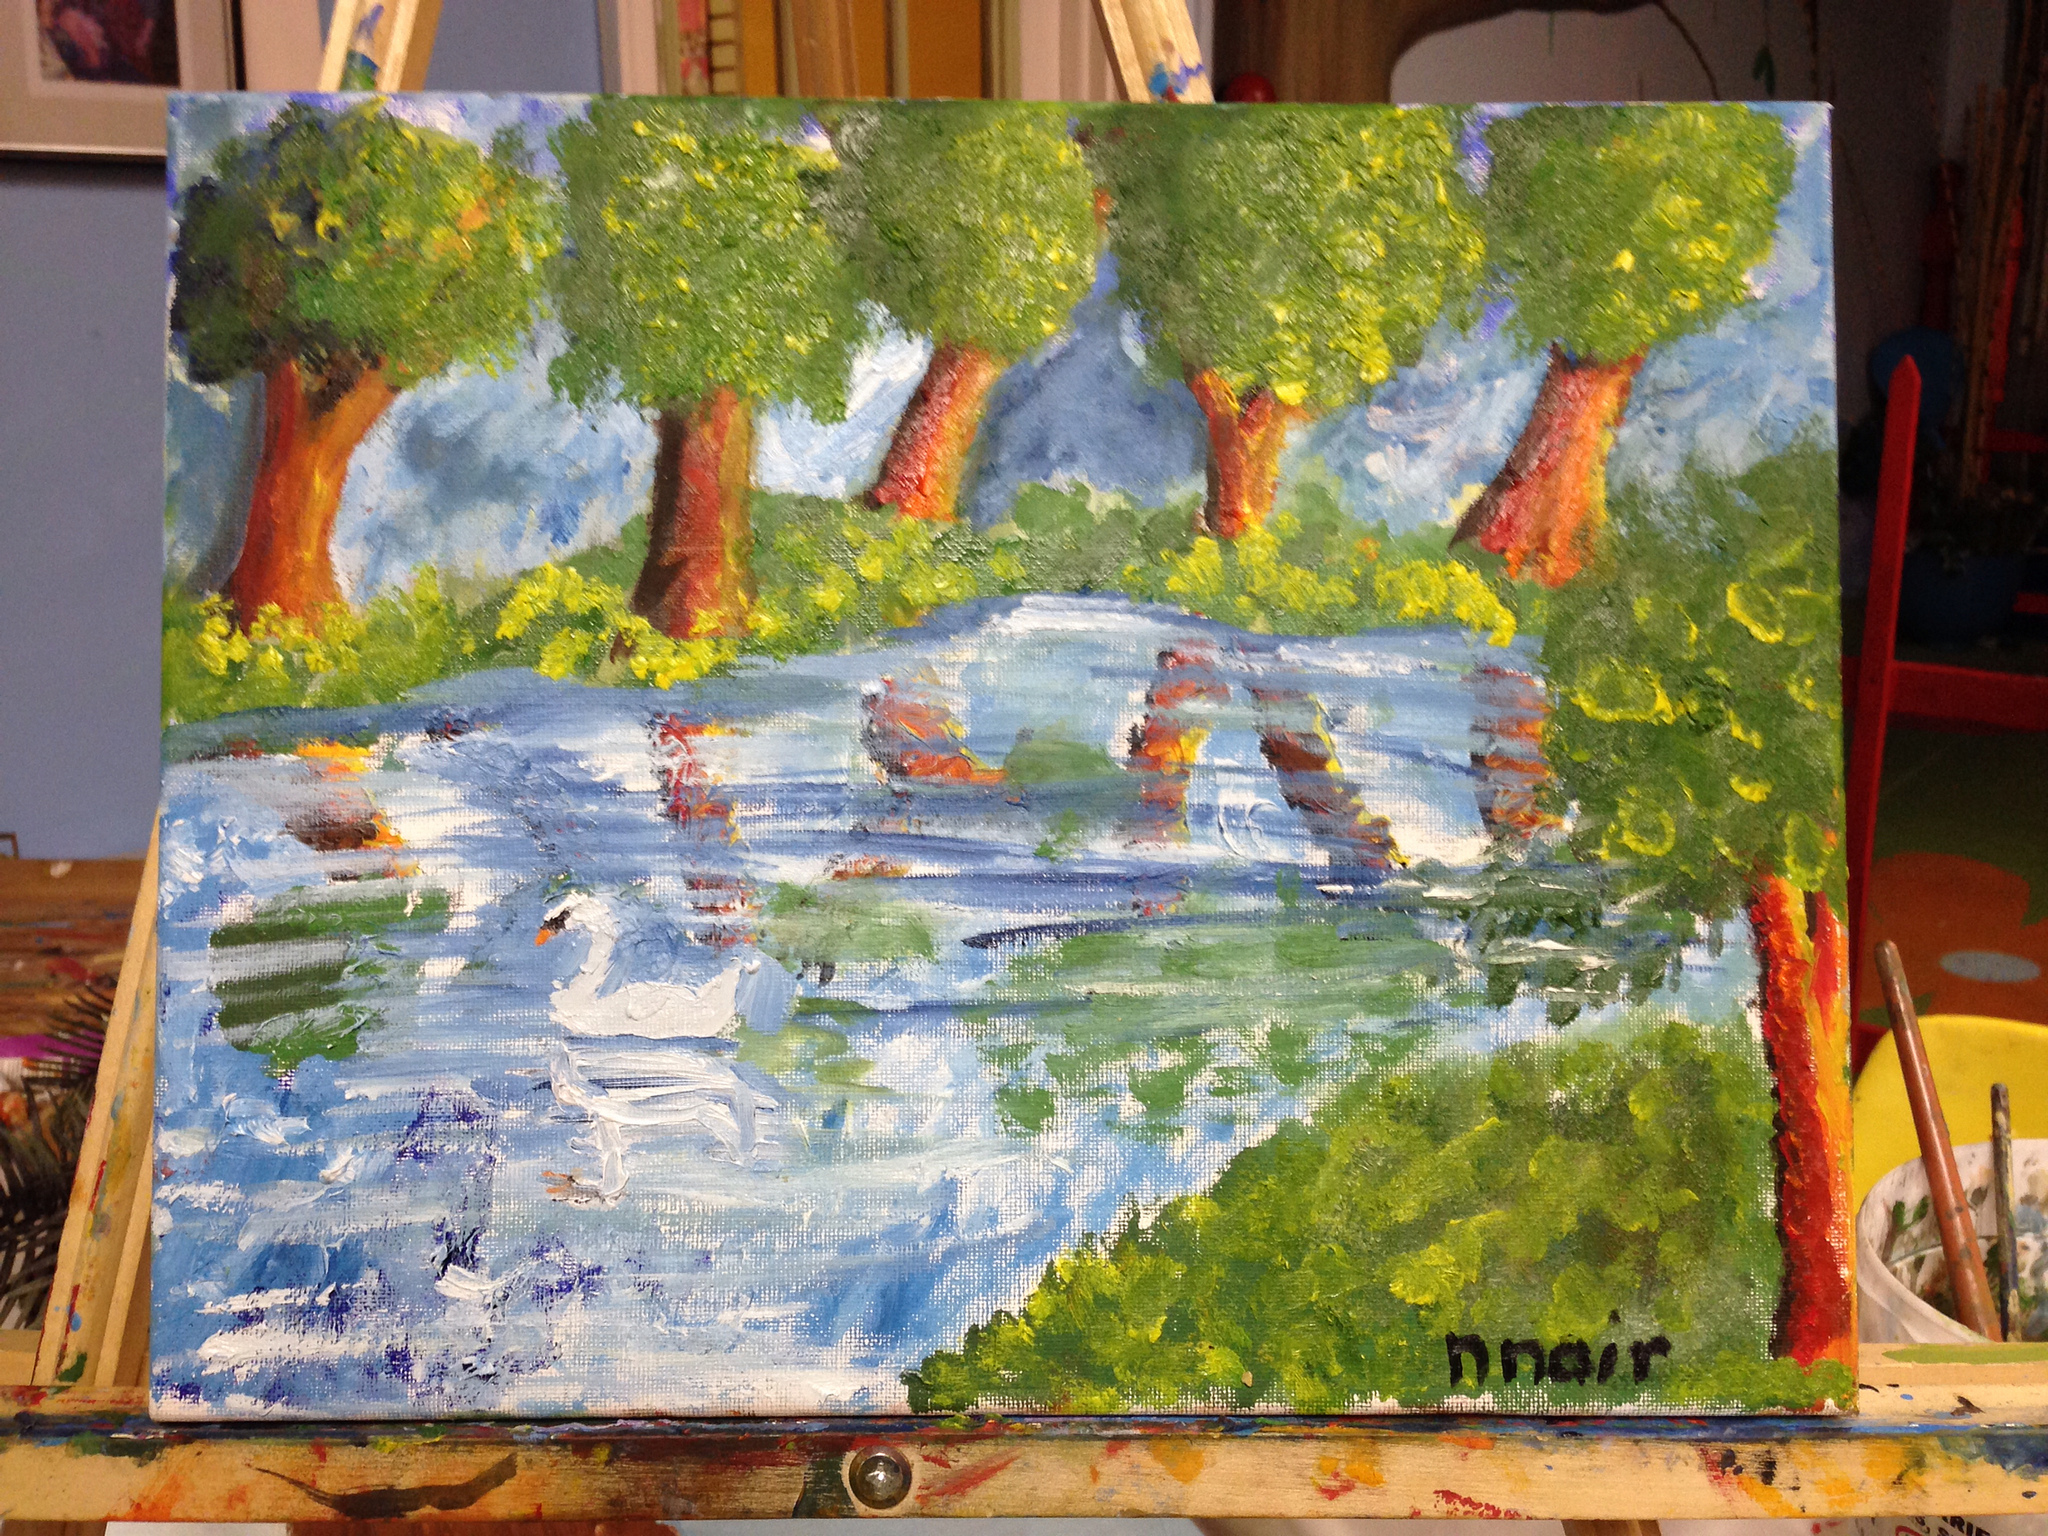
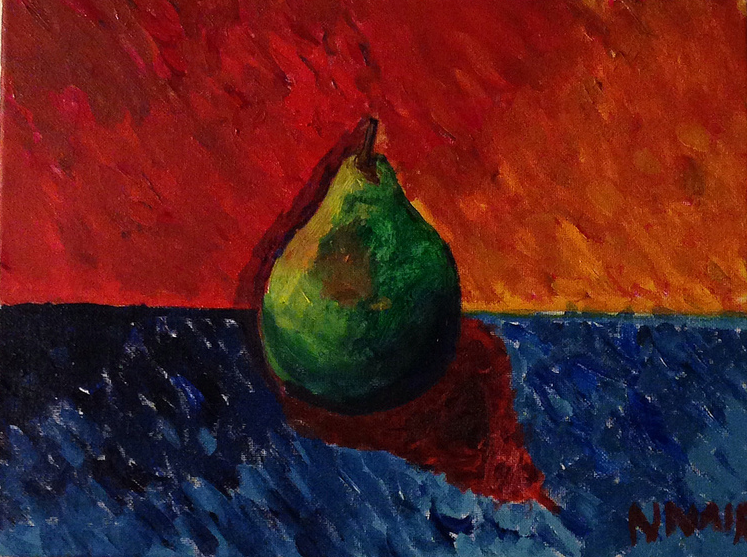
In this picture, I tried to make reflections as the central part of my painting using the impressionistic style. As you can see from the pictures in this link, at first, I tried to do a lot of things. But then I realized that in every painting, I must focus on very few things. So, I just put in the trees, water and a swan. This is how I painted it:
1. First, I sketched everything.
2. Next I painted the trees, the sky, the land and the darkest part of the river.
3. Then I changed the river and the trees to show the effects of light and tone.
4. After that, I worked on painting the land on the other side of the river and I painted the first two colors of the first tree’s reflection.
5. I worked on all the reflections using a simple trick – Flipping the canvas over and working on it. I also painted the person. I improved the look of the trees by using yellow shades for the leaves.
6. Since the person was not really getting the amount of size and portion of the painting, I erased it.
7. Finally, I painted water on the reflections, added a swan and it reflections on the water.
8. The last step was the most important one – of course putting my signature.

I did learn that the more things you add, the longer it takes to finish. It is always better to keep the painting simple with very few objects to focus on.

0
  • My Own Board Game -

    My Own Board Game - "Run Jerry Run - Prime and Composite Edition" Instruction Manual Cover

  • Run Jerry Run - Instruction Manual Cover

    Run Jerry Run - Instruction Manual Cover

  • Run Jerry Run - Instruction Manual

    Run Jerry Run - Instruction Manual

  • Run Jerry Run - Board Game, Instruction Manual and Cards

    Run Jerry Run - Board Game, Instruction Manual and Cards

Run Jerry Run – My First Mathematical Board Game

When I was thinking of Prime and Composite Numbers and also thinking about the TV show “Tom and Jerry”, I decided to create a game which had the main theme of Tom and Jerry and it would have to do with Prime and Composite Numbers. This is what I have to come up with.

By playing this game, you will know what factor pairs make a number and you will also learn which numbers are prime and which numbers are composite. Hope you enjoy playing it.

0
  • My first comic - title page

    My first comic - title page

  • My first comic - page 1

    My first comic - page 1

  • My first comic - page 2

    My first comic - page 2

My first comic art – The Adventures of Captain Underpants in “The Attack of the Purple Zombie Robot Guys”

This was my first comic art which I created by myself. I also want to thank my friend Sai from my class who helped me create the giant purple zombie robot which I named as “The Turbo Zombie Robot 2000 (TZR 2000)”. It is about a super hero known as “Captain Underpants” a children’s novel series by American author and illustrator, Dav Pilkey. Though the super hero was not original, this comic was my idea and I want to share it with all of you. This comic is about how a high school student in Chemistry class accidentally makes one of his chemical portions fly through the roof and tiny bit if it lands on every grave in the cemetery, causing all the dead people to become evil purple zombie robots. Then they become so scary that when a man saw it come near, he got so scared that he jumped out of his skeleton and ran off while the skeleton ran behind him. Then Captain Underpants comes in and defeats all of them but has to face the TZR 2000 which is 10 storey high! It is hard for him to defeat him, but finally he shoots a bomb which looks like underwear on the TZR 2000’s chest causing it to blow up. But when the mayor who is wearing all purple comes to tell him that he has to clean the mess up, Captain Underpants mistakes him for another one of the robots and gives him a wedgie. Then the whole town goes against Captain Underpants with pitch forks and torches and try to get him. But Captain Underpants flies away… The End!

0

Painting Tips That I Learnt – 4

Whenever you paint, you always want to make it look realistic with the same color as you may observe it. However, you don’t need to do that when you are painting portraits. Instead, you can choose different colors. Either way, you will get the same results if you make sure you are following the light. That is because of one thing – “VALUE”. Value is the tone of a color. For example, yellow has a light tone. Just like my self-portrait painting. As you could see, I did not use skin colors, but I still made it look realistic. The rule is “It does not matter what color you use as long as you the VALUE is right.” For example, you can use orange color for the regular skin of the person on portrait and blue color for the folds and still the portrait will look natural and artistic even though these are not the normal skin colors. This is because VALUE. So next time you make a portrait, think about different VALUES or tones of the colors. You never know when this might come in handy!

0
  • My Report -

    My Report - "All About Florida"

All About Florida

0

Painting Tips That I Learnt -3

During my third art lesson, I learn’t a few more techniques to do the painting. Most of them had to do with how to show reflection. They are as follows:

  1. When you are doing the reflection, an easy way to do it would be to flip over the painting. In that way, it will be like you are just doing the whole thing over again.
  2. When you are doing the shading and you have straight lines, an easy way to make it look natural is by cleaning off your brush completely and just swirl your paint brush through the color lines, but don’t go too crazy on in or it will get too swirled and not natural.
  3. When you are painting a river/ocean, if you make the river/ocean too blue, and you want to make it lighter, don’t take blue and white and put it on top of the blue. If you do that, it might just blend inside the blue and might become darker. Instead, what you should do it just take some white and swirl it and make big strokes on the blue. That way, it will become lighter.
0

‘Tis the Season… Symphony & Song! An Amazing Band Presentation

On December 5th, 2013, I got a chance to join a few students and staff from my school to attend a band orchestra called “‘Tis the Season… Symphony & Song!”. It was an amazing experience for me since this was first time that I went for a musical band. It was at Quincy High School in the Lloyd Hill Performing Arts Center. All the participating schools sat on the balcony and watched the show while everyone else who came were sitting on the bottom floor. There were many instruments in the show like French Horns, Tuba’s, Drums, Violins and Clarinets. I liked the Clarinets the most of all. The other fun fact is that I take Clarinet lessons every Thursday at my school. I was mostly focusing on the conductor because he was jumping around, waving his baton and he was acting funny. Then after the few songs there was an intermission. After the intermission, it all continued. Towards the end of the concert, they played 8 songs for which they had given us the lyrics and together we sing-along. It went on for about 2 hours and it ended at 9:30PM and we got back to school in less than 10 minutes.

I am very thankful that all the staff (Mr. Nicholas Ahearn, Principal, my class teacher Ms. Errichiello, other teachers from the school and the administrative staff) in the Clifford Marshall School as took time to take us to this event and made it a great success. The students were sponsored for tickets as well as Pizza dinner. It was a wonderful evening and I will always remember it.

0
  • A Cardboard TV with a Remote

    A Cardboard TV with a Remote

A Cardboard TV with a Remote

The TV
This is the first time that I have ever made a TV using cardboard. I decided to make this because I saw a cardboard box that had a opening in the front like a TV. Also, inside the box, there was more cardboard parts that could be used like the screen of the TV. So, I took all that cardboard and began working. What I did first was to take the cardboard that was inside out and drew the screen in pencil. I drew the cartoon “Sponge-Bob – Square-Pants”. Second, I traced over everything that I drew in pen. Third, I colored it. Fourth, I took lot’s of paper and covered the parts of the cardboard that had the pictures of the knife set that was packed in it. Finally, I wrote “Samsung” on the top, made the ON button on the bottom and put the “screen” inside the other piece of cardboard.

The TV’s Remote
This remote was supposed to be made out of cardboard, but since there wasn’t any more cardboard left, I used paper to make it instead. I didn’t really want to add too much detail so I only wrote what some buttons were. This is how I made it. First, I drew the shape of the remote on a piece of paper. Next, I drew the buttons of the remote. Finally, I cut it out. I hope you like this and have a nice evening. See the picture below and also find it on Flickr

0

Painting Tips that I learnt -2

Light and Shading Effect using colors:
When painting large objects, giving light effects is easy. However, it is tricky to paint thinner objects and show light and shading effects. To make the shades from light to dark, you should paint using a brush – line by line. But, if you paint using this line method, you can end up making the thin object very large if the lines are very thick. Here is a tip. What you can do instead is make a thin line with the brush. The next line should be thin and kind of overlap on the earlier line. Make sure that the new color and old color both can be seen. Repeat this with lighter color shades till you finish painting the object. In this way you can give light effects to even thinner objects. You should remember that the colors you use are either going from light shade to dark or dark shade to light, but do not mix the pattern.

0

Happy Thanksgiving – 2013

I and my family wish everyone a very Happy Thanksgiving and a great family dinner tonight. Hope all of you have a great holiday season ahead.

0

Painting Tips that I learnt -1

I learnt a few sketching tips while starting a scenery painting that I want to share:

  1. The time to finish the painting depends on the number of objects in the painting.
  2. The trees are usually fat at the bottom and skinny at the top.
  3. The trees and swans should be of different sizes and it will depend on their distance shown in the picture.
  4. In a painting, the size of the objects should be realistic. The size of the reflection of an object depends on the size of the object and it should be similar in size and shape, but opposite of each other.
0
  • The Impressionistic Pear

    The Impressionistic Pear

  • The Impressionistic Pear

    The Impressionistic Pear

The Impressionistic Pear

This painting was the first painting which I made after coming back from a nice trip from India. This painting, like my first painting – “Lighthouse in the Grasslands”, was painted using the impressionistic painting style. I learned about how if one side on the pear is light, then on the background, that same side should be dark, and if the other side on the pear is dark, then on the background, that same side should be light. That is because everything has light and dark colors. The choice of colors does not matter as long as it shows the same amount of light and shade. My first attempt to paint the pear did not work out well as I messed up with the light, the shades and painting the pear to its shape. In this trial, I first sketched it. Next, I wrote where I would put each color. Then, I used the Impressionistic style to paint the background and the fruit.

I painted the pear using the different shades of yellow and green color to show the light effect. I made sure that the pear looked rounded at the center by putting a tiny bit of red from the background to show the effect of the background. I also painted the stem by making sure that it kind of went inside the pear and provided shadow effect. I also showed light effect by putting in a shadow of the pear using combination of various colors along the direction of light. Finally, I added my signature in red.

You can see my painting on the following link. I have also put in the painting of the first pear that did not come out well. I am very happy that I could complete this painting after so many challenges. I hope you enjoyed reading this blog.

0
  • History of Apple Products - My Attempt

    History of Apple Products - My Attempt

  • History of Apple Products - My Attempt

    History of Apple Products - My Attempt

  • History of Apple Products - My Attempt

    History of Apple Products - My Attempt

  • History of Apple Products - My Attempt

    History of Apple Products - My Attempt

  • History of Apple Products - My Attempt

    History of Apple Products - My Attempt

  • History of Apple Products - My Attempt

    History of Apple Products - My Attempt

History of Apple Products – My Attempt

You can find the pictures of all the Apple products that I created at the following links:

http://www.flickr.com/photos/100081093@N06/10897881226/in/set-72157635515445822
http://www.flickr.com/photos/100081093@N06/10897845405/in/set-72157635515445822/
http://www.flickr.com/photos/100081093@N06/10897854525/in/set-72157635515445822/
http://www.flickr.com/photos/100081093@N06/10897862745/in/set-72157635515445822/
http://www.flickr.com/photos/100081093@N06/10898022044/in/set-72157635515445822/
http://www.flickr.com/photos/100081093@N06/10897932786/in/set-72157635515445822/

0
  • 2013 Halloween Pumpkin Patch Contest

    2013 Halloween Pumpkin Patch Contest

  • 2013 Halloween Pumpkin Patch Contest

    2013 Halloween Pumpkin Patch Contest

2013 Halloween Pumpkin Patch Contest

0
  • A Model on American Revolution

    A Model on American Revolution

A Model on American Revolution

Using my imagination, I created a model of the battle field of American Revolution as shown in the photo below.

You can find this picture at http://www.flickr.com/photos/100081093@N06/9817276893/in/set-72157635515445822

0

Donut Island

This was a few weeks ago at my school on a Tuesday. In our Social Studies class, instead of reading and writing in our notebooks, we decided that we would make our own landforms. A landform is one of the many forms of land. For example, a volcano and a mountain are both landforms. Almost everyone made a volcano because it was the easiest one. But I made an island. First, I sketched how I wanted it in my notebook. Next, I made it using clay. Then I made a pond in the middle, attached a stream that goes to sea, three little palm trees, a boat and a paddle. Finally, I painted everything – even the boat and the ocean. I used dark brown shade for the palm tree trunk and the boat. I used nice light green color for leaves. I used a deep blue for the ocean. Then, in the end, I added some white to the brown and used this light brown for the land. The white colors look like beaches. If you look closely, it looks like a donut! Hence I named it as “DONUT ISLAND”!

To my surprise, my uncle (Reji) and aunt (Sonali) told me that there actually exists such a donut shaped island in Philippines. Read this blog to see the real world donut islands.

0
  • Journey To The Center Of The Earth

    Journey To The Center Of The Earth

  • Journey To The Center Of The Earth

    Journey To The Center Of The Earth

Journey To The Center Of The Earth – A Book Review

Two weeks ago, my fourth grade teacher, Ms. Errichello (Ms. E), gifted everyone in the class with a book. She gave me the book titled “Journey To The Center Of The Earth”. It took me 2 days to finish reading it. It was very interesting. This is the summary of the book.

First, a man named Trevor gets a ten-day visit from his thirteen year old nephew Sean. Next, Trevor and Sean travel to Iceland to solve the mystery of the disappearance of Trevor’s brother, also Sean’s dad, Max. Along the way, they meet a girl named Hannah. Then they travel to the center of the earth and find out that an extinct bird species lives there. They also encounter a giant T-Rex. They find that Max is dead and discover his skeleton and bury it. Soon they are trapped and go through tough times. Finally, they blasted out of a volcano and reached the surface. This is the summary. A special thanks to Ms. E for this book. I really enjoyed reading it.

You can see the picture of the book here. The book details are available here.

0

A Simple Trick To Keep Your Hands Clean While Painting

Many artists paint outside and inside. However getting paint on your hands and face is common for most artists. It might take lots of time and soap to clean it. But there is one simple trick to get paint off your face and hands in just a few seconds. Using Vaseline or baby oil not only wipes the paint, but also protects your skin. Most paint removers are expensive and may be unaffordable. But Vaseline or baby oil is simple and inexpensive. As soon as paint gets on your hand, take the Vaseline or baby oil and put it on your skin and rub until the paint is invisible. Finally take a paper towel or cloth and wipe your hand. Repeat till the paint comes out. Thank you for reading!

0

Connect with me on Social Media

You can visit my Facebook Page: http://www.facebook.com/NandanHome and get to know when I post new items or photos or videos of my paintings.

You can visit my Flickr Photos Page: http://www.flickr.com/photos/100081093@N06/sets/ and get to know when I upload new photos. You can also see all my earlier photos there.

You can visit my YouTube Channel: https://www.youtube.com/channel/UCHdIRFh0sEUUHCn43vhkO6w and get to know when I upload new videos. You can also see all my earlier videos there.

Thank You!

0
  • Color and Color Notes

    Color and Color Notes

Color and Color Notes

Today, I read the book “Fill Your Oil Painting with Light and Color” by Kevin Macpherson. I learned the 3 important things about Color and Color Notes. Those three things are Hue, Value and Chroma. Hue is the name of the color. Value is the relative degree of brightness. Chroma is the relative degree of intensity. For example, inmy Grand Tree painting, I used various shades of yellow and brown colors to show light effects on the tree trunk. The color, its brightness and intensity helped to show the effects in the direction of light.The page 18 in the book describes this. Please see a photo of the page 18 and see the color spectrum.

I hope you enjoyed reading this blog.

0